Google Search Console. Recently, one of my clients asked me a question I get often:
“I published a new page, optimised everything… but Google still hasn’t picked it up”. What should I do?” Honestly, this is one of the most frustrating moments for any website owner, SEO specialist, or content creator. He said to me that he had done the hard work, researched keywords properly, written a strong article, optimised its titles and meta tags, and pressed the “Publish button”… and then, nothing. Days pass. Sometimes weeks.
And your good-looking new page remains invisible in Google search. I have also faced this problem multiple times in my life, especially when managing client websites. The page looks perfect from the outside, but behind the scenes, Google hasn’t indexed it yet, meaning it doesn’t exist in search results. This is where many people get stuck, believing that they just have to “wait it out.”


But here is the truth:
- You don’t have to wait forever.
- You can really diagnose the problem and speed up indexing if you know exactly where to look.
That’s where the Google Search Console URL Inspection tool comes in. It’s like a backstage pass into how Google sees your page. With the right approach, this tool can help you identify problems, resolve them quickly, and get your pages indexed faster.
List of top 10 Ways to solve content Indexing
This blog is my detailed answer to that common question. I’m sharing exactly 10 ways to utilise this tool to identify issues, resolve them efficiently, and enhance page visibility. I’ll write it in a concise, step-by-step format, so whether you’re a beginner or an experienced SEO, you can easily follow it and take action as needed. So, come on, let’s start our journey.
1. Understand the Basics of URL Inspection Tools
Whenever I explain this tool to my client, I like to compare it to a microscope of your pages. This lets you see how Google sees a single URL, both the indexed version, also known as Google’s memory of your page, and the live test, which is also known as what Googlebot sees right now. This gives instant clarity on:
- Whether the page is indexed or not.
- Last crawl date.
- No crawl or indexation errors.
- Mobile usability status is available or not.
- Structured data detection and alerts.
The most useful pattern here is this: whenever I fix something, I immediately run a live test and request indexing if the changes look good. This simple habit often speeds up indexing automatically.
Also, you must read this: Free Profile Creation Sites List
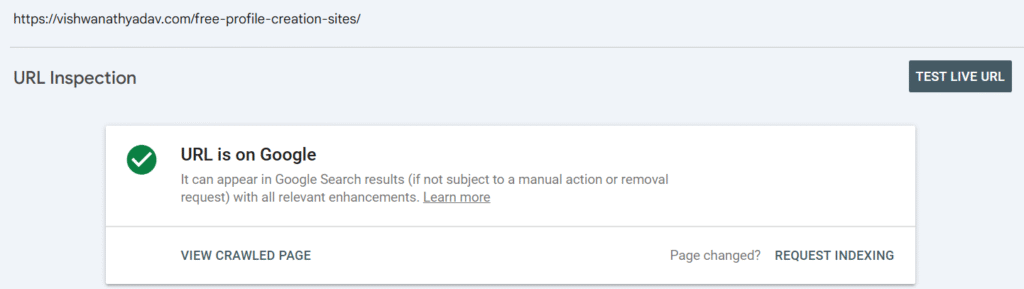
2. Check if a Page is Indexed by Google
The first thing I do when a page doesn’t show up in search is paste the URL into the inspection bar. Within seconds, Google lets me know whether the page is indexed or not. It is one of the basic steps that we use as an seo experts. If it is not indexed, the tool usually provides a reason. Some of the common things I see include:
- robots.txt or noindex tags are blocking the page.
- Thin or duplicate content.
- Lack of internal links.
- New pages on sites with low crawl priority.
When this happens, my general action plan looks like this:
- Run a live test to check the current version.
- Fix any issues shown.
- Click Index Request.
- Then I add internal links from relevant, high-authority pages and include them in the sitemap.
Actually, a strong internal link can make a big difference in how fast Google finds a page.
Also, must read this blog: How to Index Backlinks Fast in Google
3. Request indexing for new or updated pages
People often think that clicking “Request Index” is some magic trick, but really, it’s just a suggestion, not a guarantee. I use it strategically to:
- new content.
- Major Updates.
- fixing crawl errors.
- structured data or canonical transformation.
The process is very simple, even you can easily do that:
- Paste the URL.
- Run a live test.
- Click Index Request.
But I never submit thin pages or request indexing for the same unchanged URL because that can waste the crawl budget. I always pair the request with good internal links, and sitemap updates work best.
4. Analyze and fix crawl errors
Once, a customer’s page kept disappearing from search. When I inspected it, I saw a crawl error. Crawl errors are like hidden barriers that stop Googlebot in its tracks.
The URL Inspection tool shows the following 4 issues:
- 404 Not Found.
- 5xx server errors.
- redirect loops.
- blocked resources.
Here are my quick-fixing tips:
- 404:Restore or 301 redirect to a relevant page.
- 5xx: Check server logs or contact the hosting provider.
- Redirect loops: simplify to a single 301.
- Blocked resources: Allow essential JS/CSS in robots.txt.
After doing the fix, I run the live test again and click Validate Fix or Request Indexing.
Must read this: Google spam updates
5. Validate mobile usability issues
Mobile usability is a big issue now that mobile-first indexing is the default. Sometimes, Google rejects our website for monetization because of its usability. I’ve seen pages rank poorly just because of basic mobile layout issues. When I inspect a URL, I always check the Page Usability section. Some common errors I encounter are:
- The text is too small.
- Content wider than the screen.
- Clickable elements are too close.
It’s included in the duty of an seo expert to fix this issue, so I often fix these mobility issues by following these ways:
- I use a responsive layout.
- Set the proper viewport tag.
- Keep text readable (16px+).
- Ensure spacing for buttons and links.
While I’m working on this, I also look at core web vitals and optimizing both mobile usability and page speed together gives the best results.
6. Verify structured data implementation
Adding structured data is one thing; confirming Google recognizes it is another. I always use the URL Inspection tool to check the Enhancements section after adding a schema.
Common issues I mostly see:
- Required fields are missing.
- Using the wrong schema type.
- Blocked scripts.
My fixed workflow is:
- Fix schema using JSON-LD.
- Confirm with the Rich Result Test.
- Run live tests and request indexing.
When structured data is set up properly, we will have a chance of getting rich results. It can also significantly improve CTR (Click Through Rate).
7. Understand canonical tags and URL versions
I can’t count how many times I’ve seen canonical confusion mess up the index. The URL Inspection tool clearly shows the user-declared canonicals and the Google-selected canonicals.
If they don’t match, it usually means:
- Inconsistent content between versions.
- Conflicting signals.
- Bad internal linking.
My quick ways to fix canonical issues:
- Use the full URL in the canonical tag.
- Make sure all versions point to a canonical.
- Clear sitemaps and internal links.
Think of canonicals as a map of Google; if the signals are mixed, Google can choose its own route. So make sure to keep this in your mind.
8. Monitor real-time page changes and updates
Whenever I update something important which are titles, structured data, and canonical tags. I never wait for Google to “finally” notice. Instead, I use a live test to see what Googlebot sees right now.
Things I check:
- Updated title and meta.
- Robot Meta and Canonical Tags.
- Rendered HTML (important for JS-heavy sites).
Then I immediately click on the request index so that Google can quickly review he page. This is extremely useful for seasonal pages or time-sensitive content.
Also, you must read this: Free Profile Creation Sites List
9. Diagnose indexing and ranking declines
Sometimes people get scared after seeing a decline in rankings. But URL inspection tools often reveal the real cause.
Here’s my process when a page loses rankings:
- Inspect the URL for crawl errors or deindexing.
- Check the last crawl date.
- Run a live test to see if the current version renders properly.
Compare performance report trends.
If the problem is technical, I fix it and reindex. If it’s content-related, I re-optimize and rebuild the internal links. Keeping a small changelog of edits really helps to associate ranking drops with changes.
10. Ensure proper rendering by Googlebot
Finally, a slippery problem I have encountered many times is causing differences between the browser and Googlebot. Especially on JS-heavy sites, Google may not “see” some content at all.
In the URL Inspection tool:
- I run a live test
- Click View crawled pages to view HTML and screenshots
- If important content is missing, I know it’s a rendering issue.
Specific improvements include:
- Moving important content into the initial HTML
- Avoiding blocked JS/CSS
- Using server-side rendering if necessary
These rendering issues are silent killers for any website SEO; catching them early saves a lot of headaches later.
Conclusion
When someone asks me how to fix indexing or ranking problems fast, I always point them to this tool first. The URL Inspection tool gives you direct, real-time insight into how Google sees your page, no need to guess or wait for future problems.
If you make this a part of your regular SEO routine:
- Inspect each new page.
- Fix errors immediately.
- Request indexing intelligently.
- Check back after major updates.
…you’ll catch issues early and keep your pages visible.
This blog is exactly how I explained it to the person who asked me. I hope this helps you approach the tool with greater clarity and confidence. In SEO, small, consistent testing often leads to big wins. Follow Vishvanath Vadav for more updates and guidelines related to seo.


This is very helpful for me
Simply wish to say your article is as amazing The clearness in your post is just nice and i could assume youre an expert on this subject Well with your permission let me to grab your feed to keep updated with forthcoming post Thanks a million and please carry on the gratifying work
This is a great article! I really enjoyed reading it and learned a lot about Google Search Console. I’ll definitely check back for your next update or post. Thank you for sharing this!